
Thursday, July 28, 2011
My Pink Stamper Giveaways!!!!
Robyn at My Pink Stamper has some awesome stamp and cartridge giveaways AND she will soon be unveiling projects from the latest cartridge release! Be sure to visit and leave a comment to win!
Wednesday, July 27, 2011
Circle Blog Monthly Challenge: Let's Eat!
JULY MONTHLY CHALLENGE: Let’s Eat Challenge!
One of the best things about the summertime is the opportunity to have meals and family gatherings outside! This month, we want you to create something with a BBQ, Picnic, or Patio theme, AND a gingham or check pattern.


One of the best things about the summertime is the opportunity to have meals and family gatherings outside! This month, we want you to create something with a BBQ, Picnic, or Patio theme, AND a gingham or check pattern.


All the cuts for this layout came from the Cricut Lite cartridge "Block Party". The gingham background paper (both blue and red) were printed from the Imagine Best Friends cartridge. And of course, the stamped sentiment is from the My Pink Stamper "More Punny-licious" set. This set has so many cute puns that go really well with so many of the Cricut animal cartridges like "County Fair" and "Create a Critter". I plan on putting a picture of my daughter acting silly where the "hot dog" sentiment is. I hope you enjoy and come back to visit.
Monday, July 25, 2011
SO EXCITED!
I am SO excited to be added to the My Pink Stamper design team! I know that Robyn, Karlee and Maria had such a tough decision to make with all the great entries! I am truly thankful that they selected my card. Daily, I am inspired by my fellow crafters and know that you all have had an influence on my work! I hope to continue my love for paper crafting on the design team and maybe along the way, inspire you!
This is the layout I created to scrap the occasion:


All the cuts and paper are from the Imagine cartridge "Better Together". This layout would also work for an engagement, pregnancy announcement, or award ceremony.
Thank you once more to the My Pink Designer team! I look forward to creating with you!
Monday, July 18, 2011
My Pink Stamper Design Team Call
My Pink Stamper is having a Design Team Call and wouldn't you know it...I am on vacation in the mountains without any access to my craft stuff! Well, I recently did a week long card series featuring the new cartridge "County Fair" and My Pink Stamper stamp sets. One of my cards follows the color requirements and so I am going to submit with the hope that Robyn will understand and accept my entry.
Design Team Guidelines:
Create a scrapbook page, card or cricut project using the color combo of green, turquoise, orange, brown and a color of your choice.
![]()
![]()
Supplies:
* County Fair cartridge
* Page 49: Chick, Chick-s, Layer 1, Layer1-s, Layer 2 ~ all cut at 4.0"
* Page 51: Gate-s, Layer 1, Layer 1-s ~ all cut at 4.0"
* Page 54: Layer 1, Layer 1-s, Layer 2 ~ all cut at 2.0"
* Imagine cartridge JT
* My Pink Stamper "Even More Punny-licious"
* Stampin Up cardstock
* Stampin Up ticket punch
* Stampin Up Early Espresso ink and Apricot Appeal craft ink
* Stampin Up brads
* Cuttlebug Embossing Folders, Plum Blossom Set
Don't you just love how My Pink Stamper stamp sets match Cricut cuts? Good luck to everyone that enters Robyn's design team call!
Design Team Guidelines:
Create a scrapbook page, card or cricut project using the color combo of green, turquoise, orange, brown and a color of your choice.


Supplies:
* County Fair cartridge
* Page 49: Chick, Chick-s, Layer 1, Layer1-s, Layer 2 ~ all cut at 4.0"
* Page 51: Gate-s, Layer 1, Layer 1-s ~ all cut at 4.0"
* Page 54: Layer 1, Layer 1-s, Layer 2 ~ all cut at 2.0"
* Imagine cartridge JT
* My Pink Stamper "Even More Punny-licious"
* Stampin Up cardstock
* Stampin Up ticket punch
* Stampin Up Early Espresso ink and Apricot Appeal craft ink
* Stampin Up brads
* Cuttlebug Embossing Folders, Plum Blossom Set
Don't you just love how My Pink Stamper stamp sets match Cricut cuts? Good luck to everyone that enters Robyn's design team call!
Saturday, July 16, 2011
It's a Wrap Blog Hop!
Welcome to the It’s a Wrap Blog Hop hosted by Cool Beans By L.B. Do you like to receive gifts? How about give them? Well this hop is all about the outside…the wrapping; Gift bags, boxes, baskets and more. There are 22 wonderful stops on this hop and we hope you will take some time to stop in and see everything we have created for you.
You should have arrived here from scrappinmystressaway. If you are just finding our hop in the middle you can go to the beginning at Cool Beans By L.B.
For my project I created a gift purse. You can use it to hold a gift card, small trinket, or even a small treat. In addition, you can embellish the inside to create a pop open mini-album!
![]()
![]()
![]()
![]()
![]()
Incase you get lost...here is a complete list of the blogs for this hop:
You should have arrived here from scrappinmystressaway. If you are just finding our hop in the middle you can go to the beginning at Cool Beans By L.B.
For my project I created a gift purse. You can use it to hold a gift card, small trinket, or even a small treat. In addition, you can embellish the inside to create a pop open mini-album!
 |
| 1. Start with 2 sheets of 2 sided 12x12 designer series paper, 2 coordinating 8 1/2 x 11 sheets of solid cardstock, coordinating ribbon and an embellishment (flowers, buttons, a stamped saying). |
 |
2. Score one sheet of the dsp at 4" on each side.
3. Score and fold all 4 sides at 4".
4. Score and fold all 4 corners down the center.
 |
 |
| 5. Score and fold two centers, only at two inside corners to outside center. |

 |
| 6. Fold in the 12x12 paper. |

 |

 |
| 7. Cut cardstock 4" x 4 3/4". 8. Cut Top note (contrasting color) . |

 |
| 9. Punch slit at center of long side of top note. |
 |
| 10. Adhere lightly, top note to 4 x 4 3/4 cardstock. 11. Score and fold both at 2 and 2 3/4". 12. Run ribbon through slits and adhere with two-sided tape. |
 |
| 13. Attach top to one center of 12x12 and close. 14. Add velcro for closure and close. 15. Add embellishment to op center of purse front. |

 |
| 16. As an option, you can decorate the inside to make a neat fold out mini-album. |
 |
| Voila! |
Thanks for stopping by on this fun hop. Your next stop is scrappinformorefun.
Incase you get lost...here is a complete list of the blogs for this hop:
IT’s A WRAP BLOG HOP LINE UP
Cool Beans By L.B. (HOST)
Stephanie from onceuponapaper http://onceuponapaper.blogspot.com/
Brenda from Random Thoughts of a Scrapbooker http://happyscrapper64.blogspot.com/
Maria from Stamp Cut Create http://stampcutcreate.blogspot.com/
Terri from http://scrappinwiththebug.blogspot.com/
Lori Apgar from http://www.scrappinmystressaway.blogspot.com/
Anabel aka cricutaddicted from http://scrappingformorefun.blogspot.com/
Michele from Green Girl Scraps http://www.michelegreen.com/
Alicat from http://scrappingwithalicat.blogspot.com/
Everything Digital Scrapbooking http://digipage-blog.everything-digital-scrapbooking.com/
Robin, The Scrappin' Delta Diva http://scrappindeltadiva.blogspot.com/
Gamma's Creative Corner http://gammascreativecorner.blogspot.com/
Paper Crafting Chic: http://www.papercraftingchic.com/
Thank you again for visiting! Please come back and visit!
Cricut Circle Blog Weekly Challenge #36: Fabric
Weekly Challenge #36: Fabric Challenge!
The Challenge: All week long on the Cricut Circle Blog we have been incorporating fabric into our projects . . . now it’s your turn! Create a project of your choice (Scrapbook page, mini album, card, home decor . . . it’s up to you!) including fabric in some way.
![]()
![]()
![]()
![]()
I love these cards...they are so fun! The cloth used are the dresses. The cartridge used was Forever Young.
The Challenge: All week long on the Cricut Circle Blog we have been incorporating fabric into our projects . . . now it’s your turn! Create a project of your choice (Scrapbook page, mini album, card, home decor . . . it’s up to you!) including fabric in some way.


I love these cards...they are so fun! The cloth used are the dresses. The cartridge used was Forever Young.
Friday, July 15, 2011
Cricut Circle Pennant Contest
Although the event is full, the Cricut Circle Team has two ways for everyone in the Circle to participate—this includes attendees.
1. Provo Craft will be having a pennant contest. The ‘pennant’ you are creating is a way for you to showcase your state, country, or providence. (See a sample at the top of this post.) We will be using all the pennants to decorate the room and make one giant banner.
The requirements include:
a. Theme:
The pennant should be your representation of the state, providence or country of your choosing.
b. Pennant Size and Shape
The pennant shape is from the BIRTHDAY BASH CARTRIDGE. The ‘pennants’ that can be used are in the section on pages 58-70. Please use a ‘fit to page’ for a 12×12 inch piece of paper. Pennants larger than 12×12 will be disqualified.
![]()
![]()
I had all sorts of drama creating this pennant! I am out of town this week and forgot my Gypsy to the machine cord. I searched all over the city for one and just about gave up when Okieladybug and Misty came to my rescue and produced a cable for me to use! They are the BEST! AND they have fantastic blogs (click on the links to visit)!
The carts I used were 50 States, Birthday Bash and County Fair. Thanks again to my circle sisters and good luck to everyone!
1. Provo Craft will be having a pennant contest. The ‘pennant’ you are creating is a way for you to showcase your state, country, or providence. (See a sample at the top of this post.) We will be using all the pennants to decorate the room and make one giant banner.
The requirements include:
a. Theme:
The pennant should be your representation of the state, providence or country of your choosing.
b. Pennant Size and Shape
The pennant shape is from the BIRTHDAY BASH CARTRIDGE. The ‘pennants’ that can be used are in the section on pages 58-70. Please use a ‘fit to page’ for a 12×12 inch piece of paper. Pennants larger than 12×12 will be disqualified.


The carts I used were 50 States, Birthday Bash and County Fair. Thanks again to my circle sisters and good luck to everyone!
Cricut Circle June Magazine Challenge 2011
JUNE MAGAZINE CHALLENGE!
TERESA COLLINS SPONSOR CONTEST!
Teresa Collins is one of our favorites in our little Circle! We have featured her paper collections and Imagine Cartridge all through this month’s issue. It’s only fitting to use her designs in our contest this month! We invite you to create a project, layout, card or gift item using any of her paper collections, Imagine cartridge or Blingage. We would like it to have a celebration theme. Maybe an elegant birthday, anniversary or wedding.
Contest Rules: Use at least 4 Cricut Cuts from any cartridge in your design and at least 3 Teresa Collins products like her paper collections, Imagine cartridge, Blingage, albums or any other product she produces in your design.
![]()
![]()
![]()
TERESA COLLINS SPONSOR CONTEST!
Teresa Collins is one of our favorites in our little Circle! We have featured her paper collections and Imagine Cartridge all through this month’s issue. It’s only fitting to use her designs in our contest this month! We invite you to create a project, layout, card or gift item using any of her paper collections, Imagine cartridge or Blingage. We would like it to have a celebration theme. Maybe an elegant birthday, anniversary or wedding.
Contest Rules: Use at least 4 Cricut Cuts from any cartridge in your design and at least 3 Teresa Collins products like her paper collections, Imagine cartridge, Blingage, albums or any other product she produces in your design.

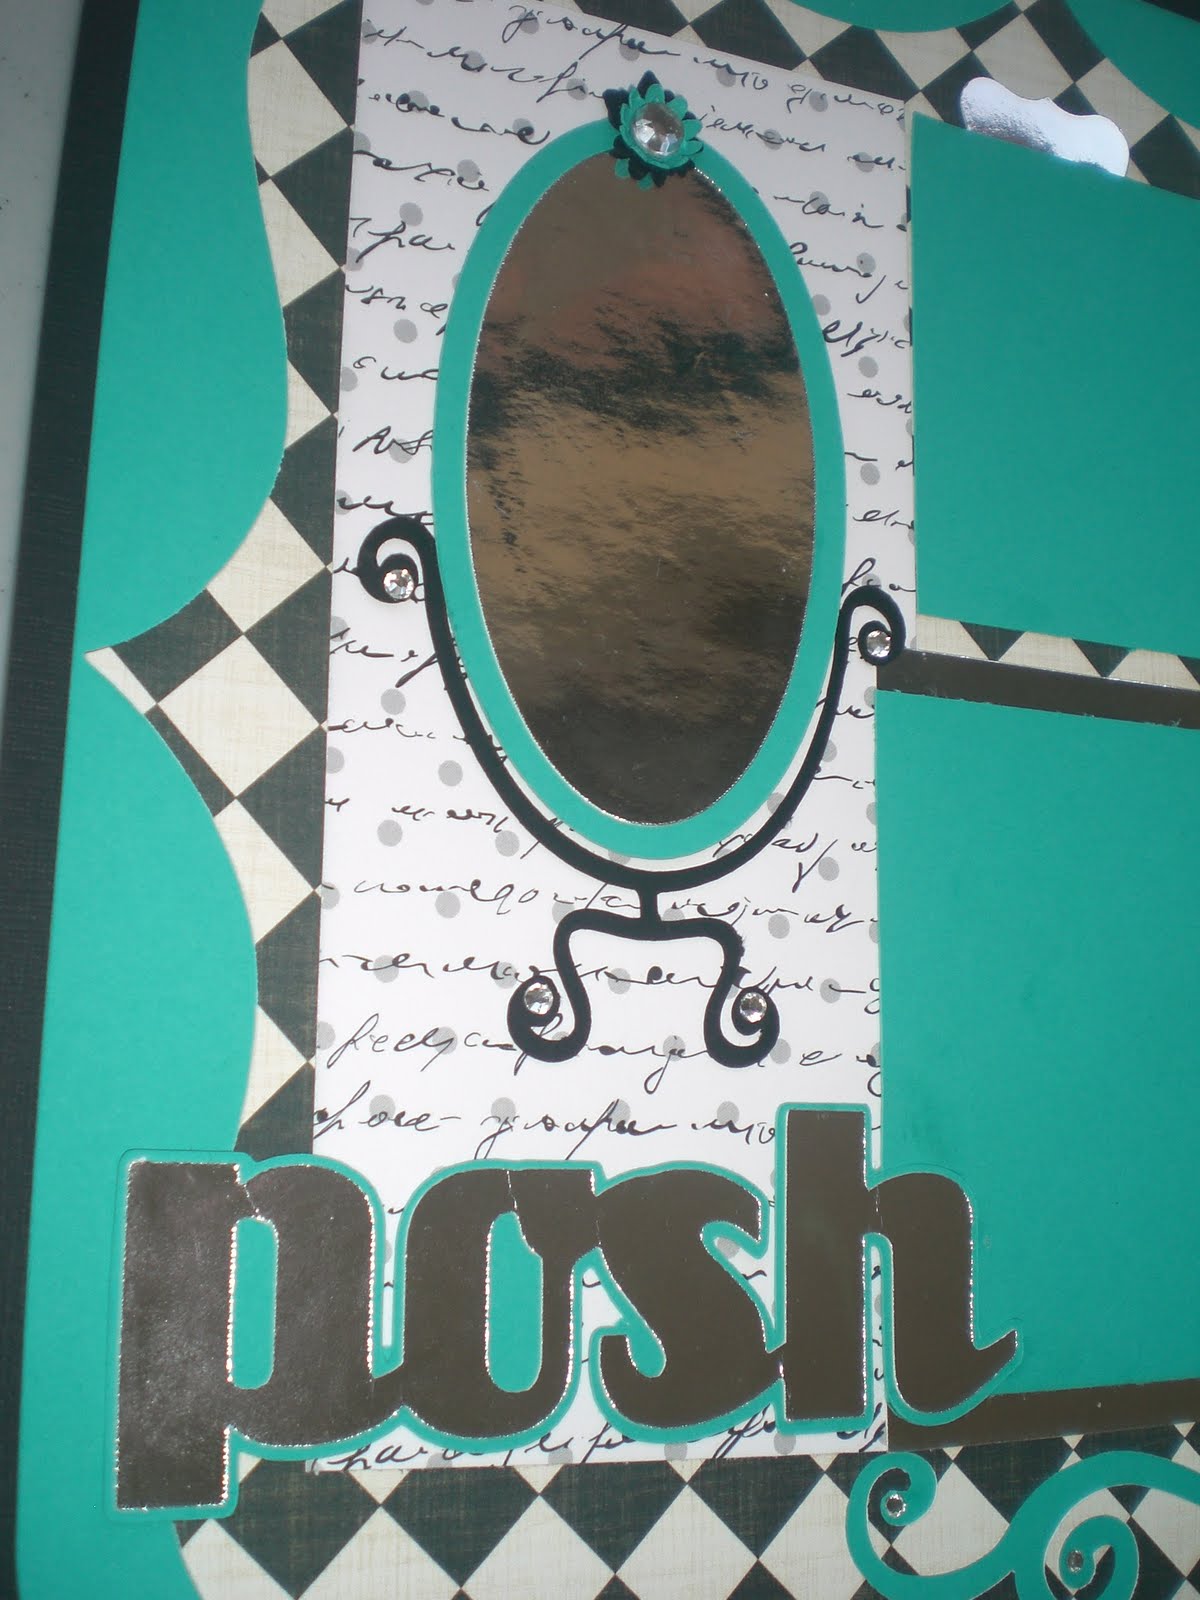

I created this layout using Teresa Collins designer paper, blingage & trims. Teresa's products remind me of everything feminine, so I just had to create a feminine page. The carts used were Elegant Edges and Mini Monograms for the frames and Forever Young for the dressing mirror and title.
Thursday, July 14, 2011
Stampin Up Card Series ~ Post #4


This card is soft and feminine with a vintage/shabby chic look to it. It is not a difficult card to make, but has a finished look to it.
Supplies:
- Rose Red and Very Vanilla cardstock
- "Springtime Vintage" designer series paper
- Rose Red ink
- "Top Note" bigz dies
- "Well Scripted" stamp set
- "Perfect Polka Dots" embossing folder
- "Decorative Label" punch
- "Itty Bitty Shapes Punch Pack" punch
- 3/16 corner punch
- "Vintage Flower" adornments
- "Victoria" 5/8" crochet trim
- Very Vanilla 5/8" satin ribbon
- Basic Pearls
Wednesday, July 13, 2011
Stampin Up Card Series ~ Post #3
Welcome back! I think this card is just so elegant! I love the color combo:
![]()
![]()
Supplies:
Hope to see you back tomorrow!


Supplies:
- Pear Pizzaz, Early Espresso & Whisper White cardstock
- Paisley Petals designer series paper
- "With All My Heart" stamp set
- Early Espresso Ink
- 1 1/4" square punch
- Basic Pearls
- Bitty Buttons
- Cherry Cobbler seam binding ribbon
- Stamping dimensionals
Hope to see you back tomorrow!
Tuesday, July 12, 2011
Stampin Up Card Series ~ Post #2


- Stampin Up Chocolate Chip, Very Vanilla & Pretty in Pink Cardstock
- "Top Note" Bigz Dies
- Old Olive 1/4" Grossgrain Ribbon
- "Elements of Style" Stamp set
- Basic Black & Early Espresso ink
- Pretty in Pink and Old Olive markers
- Vanilla Shimmer Smooch Spray
- Stamping Dimensionals
Subscribe to:
Posts (Atom)